Executing a .Net DLL/Assembly Method from SQL Server Stored Procedure or SQL Function and Calling the Stored procedure from K2 SmartObject.

Hello Everyone,

Wish you all a Happy New Year!! Hope you are doing well!

Recently I was assigned with a task to generate a custom report/Application Form Softcopy from K2 application, there is something which our team have already developed and being used for this purpose. We have a word document as template which has replaceable fields mentioned in a specific format. There are around 300 – 400 fields. All the data is residing in Database tables, and then there is a .Net Assembly which takes 400 optional string parameters and template file path as input and reads through template document and replaces the fields in document if parameters has values and saves the file in a specific location on the server and returns the generated file path. So, to use this dll we have created a smart object.

Now the process that we are currently doing is

Step 1: Get all the required fields for report generation from Database using a Smartobject.

Step 2: Call the Smartobject for ReportGeneration DLL using all the fields received from step 1.

This method works absolutely fine but what I felt was that why we need to make 2 calls (one to get data and second to pass the data to dll and generate report) why not just make one call with reference number that we have to database and then let database store procedure take care of gathering data & report generation

So that’s when I started to look at options to call a .Net DLL from stored procedure 😊 and found out that there are ways to achieve this. let’s learn this together with below sample I tried.

We have 3 Steps to execute this sample

Step 1: Create a Sample Assembly with a method.

Step 2: Add Assembly to SQL Database and Create StoredProcedure on the Assembly Method.

Step 3: Create K2 Smart object on SQL Procedure and execute.

Step 1: Create a Sample Assembly with a method.

I have created a Sample Assembly which has 2 methods, they take a string value as input and returns character count. Below is the C# code for the Assembly & class with sample methods.

Let’s dig a little deep into the code above.

  • Class needs to be “public” & methods needs to be “public static”.
  • [Microsoft.SqlServer.Server.SqlProcedure] – This is to say that this method will be called from SQL Stored Procedure. There are other Types which are supported, details can be found at below link.

https://learn.microsoft.com/en-us/dotnet/api/microsoft.sqlserver.server.sqlmethodattribute?view=netframework-4.8.1

Also return type of the method we mentioned as “void” but return will be sent using “SqlContext.Pipe.Send

There are different types Data SqlDataRecord that we return, check the Microsoft documentation at the link specified above.

  • This code is for a SQL function.

[SqlFunction(IsDeterministic = true,IsPrecise =true)]
public static int VijaySQLTestFunction(string inputString2)
{       
   return(inputString2.Length);
}

Now the Building Sample Assembly part is done. Just Build it and check for any errors and once done copy the DLL path.

Step 2: Add Assembly to SQL Database and Create StoredProcedure on the Assembly Method.

Now we need to execute below SQL Queries in your database in sequence as I’m mentioning for registering the DLL

  1. Enable CLR (by Default it will OFF)
  • Register Assembly (Give the dll path and name)

Check if the assembly has been created.

You can also create from the window by using right clicking on the Assemblies Folder and select New Assembly and fill the details

  • Create Stored Procedure with created assembly as external reference

EXEC spStringLengthFromAssembly ‘This is a TEST String’
GO

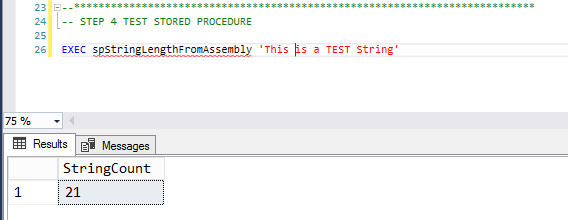
You see the from the DLL if you remember we mentioned a SQL data record with name “StringCount” so you can see same column name here in result 😊

SqlDataRecord sqlDR = new SqlDataRecord(new SqlMetaData[] { new SqlMetaData(“StringCount”, SqlDbType.Int) });

  • Let’s use the other Assembly Method to create a Function, its almost same process as we created StoredProcedure but with some minor change as mentioned in below query
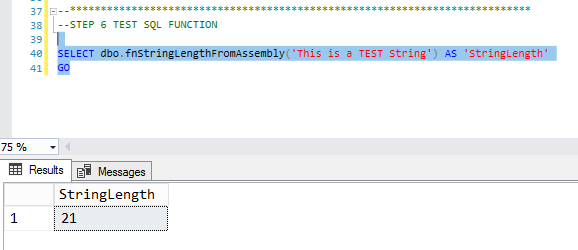
  • Once above query executed successfully Let’s test the function.

SELECT dbo.fnStringLengthFromAssembly(‘This is a TEST String’) AS ‘StringLength’

GO

Step 3: Create K2 Smart object on SQL Procedure and execute.

Now You might be thinking that its just easy thing to create a smartobject on this stored procedure and use it from K2 but there a twist here 😉. After you create a Service Instance on this Data Base, K2 is unable to read the output parameters of stored procedure that we created (In Our Case the output parameter should be “StringCount”) and see below screen shot from K2 SmartObjects Tester Utility, we are able to see input parameter “InputString” but no return Parameter.  

So as an alternative approach I have shown you how to create a function on top of .Net assembly and now we will creating one more Stored Procedure in SQL which will call the function inside and return the result for us.

  • Execute below SQL

  • TEST the Procedure & Check result

EXEC spWrapperStringLengthFromFunction ‘THIS is a test string2’

GO

Once the result is Ok, just refresh your service instance and Check the for this new Stored Procedure.

Now the final step is to create a smartObject and check the result from SMO,

Success!! We can see the result from the SMO.

Now that we have seen this basic sample, we can use this approach and extend it for serving our development purposes.

Below mentioned are few things to be kept in mind while using this approach.

  • When there is any change in the DLL, we have to update the Assembly reference using below query
  • Also, we need to consider that if we have referenced any assemblies in our DLL, then we need to copy those Referenced assemblies while creating assembly in SQL.
  • Also,  we can explore other return types of SqlContext.Pipe.Send().

Just to iterate please find all the queries that we have executed below

That’s it for this Post, Thanks for Reading!!

How to Highlight Selected Items inside Checkbox List K2 Smartform.

Hello There, let’s see a simple CSS & JavaScript technique to highlight the selected items of a checkbox list inside a K2 smart form.

As you know K2 choice control as a checkbox list doesn’t have much options to highlight the selected items, we can use this simple JavaScript code to highlight the background of selected items which will update automatically on change of selection. Please find the script below.

<script>

$(“.checked”).css(“background-color”, “#d4ffaa”);

$(‘[name=”ChoiceData”]:checkbox’).on(‘change’, function(){

   if(this.checked)

    {

        this.parentElement.setAttribute(‘style’, ‘background-color: #d4ffaa;’);

    }

    else{

      this.parentElement.setAttribute(‘style’, ‘background-color: white;’);

   }

});

</script>

Change the name inside the script as per your Choice control’s name, in my case choice control’s name is “ChoiceData

Inject this script into smartform using a datalabel and expression and that’s it. Check the magic as shown in demo below.

Note: Here I have used Choice Control as Checkbox List. I haven’t tested this with actual CheckBox List Control.

How to update K2 Smartform control value from Javascript.

Hello there, Hope you are doing well. It’s been quite a while since I have made a post on K2. Today I have found an interesting thing while doing some research in K2 smartforms, I’m updating a data label value from javascript and trying to use the updated value in K2 Rules, When I did the update it is reflecting the new value on screen but to my surprise it is giving the old value when I’m using it in server rules.

I tried many things like updating the innerHTML, setting the innerText, using Text() function but none of them seems to update the value of the datalabel for using in rules.

When I was searching for the reason, I found a wonderful piece of code which can be used to properly update the control values from javascript to get the updated values in smartform rules.

Let me explain this using the sample scenario below.

I have view with controls as mentioned below

DataLabel with name DataLabelSample with default value “Sample Text on Load” used for updating and showing the text

Button with name ButtonUpdateDL which will be used to update datalabel text to “Sample Text Updated from JavaScript” by running a javascript

Button with name ButtonShowDLText which will be used to show the value of datalabel in a messagebox.

Also, here I’m using HTML Literal Control, to inject the javascript to update the DataLabel text as given below. If you don’t have this control in your environment, you can use a hidden datalabel and set literal as true and keep this js in expression like shown in below article

<script>

//Script to bind click function to Button

$(‘a[name=”ButtonUpdateDL”]’).bind(“click”, function(){

// alert(‘Hello from JS’);

  $(‘span[name=”DataLabelSample”]’)[0].innerText=’Sample Text Updated from JavaScript’;

});

//# sourceURL=vijayScript.js</script>

Now when I run the form you will see the issue.

You see, we are able to update the datalabel from javascript but when I use the datalabel value inside the rules, it is showing the old Value.

I have tried multiple permutations and combinations to update the value but couldn’t able to do it until I found this wonderful post from Mr. Nathan Brown at below article

https://community.nintex.com/k2-blackpearl-13/smartform-set-textbox-value-by-javascript-when-focussed-it-gets-cleared-14334

and the code he posted to update the SmartForm Control is shown below. This method can used to update multiple controls like DataLabel, Textbox etc.

To use this just add below code in your script and just call this method by passing ControlName and value to be updated. Basically the code is triggering the SetValue function of the control and then onChange event of the control.

function UpdateSFControl(ControlName, Value) {

    var controlXPath = ‘Controllers/Controller/Controls/Control[@Name=”‘ + ControlName + ‘”]’;

    var windowToUse = window;

    if (!checkExists(windowToUse.viewControllerDefinition)) {

        windowToUse.viewControllerDefinition = $xml(windowToUse.__runtimeControllersDefinition);

    }

    var myControl = windowToUse.$sn(windowToUse.viewControllerDefinition, controlXPath);

    var controlInfoObj = new windowToUse.PopulateObject(null, Value, myControl.getAttribute(‘ID’));

    windowToUse.executeControlFunction(myControl, ‘SetValue’, controlInfoObj);

    windowToUse.raiseEvent(myControl.getAttribute(‘ID’), ‘Control’, ‘OnChange’);

}

Now I updated the javascript  by adding the above function

And when I run the form now it is updating the lable and I’m able to retrieve the updated value in K2 rules.

This way we can make use of this javascript code and achieve things in K2 Smartforms.

Thanks for Reading!

Using K2 Out of the box PDF control to generate a printable PDF document in K2 Smartforms.

Today I’m going to create a sample page which uses K2 Out of the box “Save As PDF” control to generate a pdf document of a K2 smartform. Let’s start!!

Step 1:  Add necessary Controls on the Details View where you need the Export PDF functionality

  • Drag a Toolbar button on the view where you need to export to pdf and give the text as Export to PDF and from icons select PDF icon.
  • Drag the Save As PDF Control to the View.
  • Drag a data label, make it visible false and name it as PDFID.

Step 2: Create a View to show as a modal dialogue while PDF is being generated.

Create a view with one Data label and one attachment control in 2 sequential rows as shown below. Also add one parameter PDFId. This view we will shown to user when they click on Export to PDF button. Also we will load the generated PDF file in this view itself so that the user can click on the file to download.

Now in the Rules, When the View executes Initialize rule, add rules as shown below.

PDF SmartObject can be found at path as shown below

Step 3: Add necessary rules to Details View to generate PDF

Rule 1: Now in the details View When Export to PDF Button is clicked Add rules as shown below. Here we have to

1. Hide the button so that while generating PDF button will not be seen on generate pdf.

2. Execute the PDF OOB Control’s  Save PDF Async method. And click configure to see the PDF options

3. Use open a sub view rule to show the view Modal dialogue with some message for user as shown below

Rule 2: When a Control on a view raises an Event, Select Save As PDF Control and select Complete Method and add the rules as shown below.

In above screen shot

1. Use transfer data rule and inside that drag the Save As PDF control on to the PDFID data label. This will have the Id of the pdf document generate.

2. We have use Transfer data to a subview and pass the PDFID control from View to Subview Parameter.

3. Use Execute a Subview method and select Intialize method.

4. Show the Save PDF button Control.

That’s it now just save the form and test. You can see the trail execution in below gif image.

Things to consider.

Some times the pdf generated will have some un even page breaks disturbing the view of smartform.

To fix this issue we have to add a java script code which is explained clearly at below article.

https://www.concurrency.com/blog/january-2017/working-with-the-k2-pdf-control-in-smartforms-and

Thanks for reading!!

How to Install a Custom Font and Register it in K2.

Though we have different fonts made available for use in K2 designer by K2, some design enthusiasts still look for using custom fonts inside the Smart forms for improving the look & feel of the User Interface. This is a pretty common requirement which we come across many clients. So let’s see how we can install a new font on the K2 Machine and add it inside K2 for usage across Smartforms.

Step 1: Download and install required font on K2 Server Machine.

I found an interesting unique font which I liked. I’m going to use that font for creating this sample. Font Name is IDAutomationHC39M. This font speciality is that it gives a barcode representation for any text or character that we use and looks very cool. You can download this awesome font from below link.

https://www.fontspace.com/idautomationhc39m-font-f19441

Once the download is finished you will get a zip file as shown below

Extract the zip to see 2 Font files with extension .otf & .ttf as below.

We can use any of them for installation there are some minor differences between those 2 font files but that they are not that important. Here I have copied .otf file to K2 Server and double click on Idautomationhc39m-Mr9x.otf file and it will open a window as below where you need to click on Install button.

Once Installation is finished the Install button gets disabled which means the installation has been completed successfully. Now to just verify we can open a notepad and see the font is available for selection in Format -> Fonts tab. If you see that barcode format in fonts as below then it is installed properly.

Also you can check at path C://Windows/Fonts and see whether it is available or not as below

Now that installation is complete we go to Step2

Step 2: Register the Font with K2

Now to register the newly installed Font with K2 we need to take the help of a C# console application.

Open Visual Studio and create new Console Application give it a name and open program.cs file and paste below code.

using SourceCode.Forms.Management;

using SourceCode.Hosting.Client.BaseAPI;

using System;

using System.Collections.Generic;

using System.Text;

namespace CustomFontsExamples

{

    public class CustomFontsExamples

    {

        public static void Main(string[] args)

        {

            CreateFontExample();

            //UpdateFontExample();

            //DeleteFontExample();

        }

        public static void CreateFontExample()

        {

            //Create a new font instance

            Font font = new Font()

            {

                Name = “IDAutomationHC39M”,

                FontFamily = “IDAutomationHC39M”,

            };

            // Open connection to host server

            FormsManager manager = new FormsManager(“localhost”, 5555);

            // Save new font instance

            manager.CreateFont(font);

        }

        public static void UpdateFontExample()

        {

            // Open connection to host server

            FormsManager manager = new FormsManager(“localhost”, 5555);

            // Get existing fonts explorer

            FontExplorer fonts = manager.GetFonts();

            // Get specific font instance

            Font font = fonts.Fonts[“IDAutomationHC39M”];

            // Update font instance

            font.Name = “IDAutomationHC39M”;

            font.FontFamily = “IDAutomationHC39M”;

            // Save modified font

            manager.SaveFont(font);

        }

        public static void DeleteFontExample()

        {

            // Open connection to host server

            FormsManager manager = new FormsManager(“localhost”, 5555);

            // Delete font by name

            manager.DeleteFont(“IDAutomationHC39M”);

        }

    }

}

  • After adding this code we need to add below references to this project from the path “%PROGRAMFILES%\K2\Host Server\bin\”
  • References

SourceCode.HostClientAPI.dll

SourceCode.Forms.Management

  • Also set project target framework .Net Framework 3.5

*Note: In above code in method CreateFontExample() if manager.CreateFont(font); is throwing an error then replace it with manager.SetFont(font);

Now build solution and execute.

That’s it. Now just go and refresh K2 Designer and see the new font should be available for you in format options.

Text final look.

Below are some additional points to consider.

  1. To deploy this across multiple environments we just need to copy the .exe file from the debug folder of console application that we created above and run it . Before running the exe we have to install the font by copying the Idautomationhc39m-Mr9x.otf file and install.
  2. All the client’s machines which need this font have to be installed with font.

That’s it for this post. Hope you guys liked it. Thanks.

How to use simple out of the box Export to Excel feature in K2.

Exporting date to excel is a common requirement which we see across many applications. Keeping this in mind K2 have provided a simple out of the box & easy to use feature using which we can easily export the K2 List view data to an excel sheet.

Let’s see how we can use this feature with a sample application.

Here I have a List of students for which I have created a smartobject and a list view to show the list. Edit the list view and on top section drag a tool bar button and select Export to excel icon as shown in below screen shot.

Now go to rules tab and add click add rule and then select execute a method on view from actions tab and click configure method and select Export to Excel method. Additionally you can show a message to user that “Excel Download will begin shortly”. Once you add the rules it should look as below.

That’s it we have configured the rules required. Now run the listview and click the button to see the Excel getting downloaded.

Data inside Excel sheet.

Code in Action

Pretty simple made by K2 right!! 🙂

Now let’s see some additional requirements which we may come across while implementing this which I’m going to discuss below.

  1. What if we want to allow or show only few columns inside excel.

Yes we can do it using rules. Let’s say from above example we don’t want to allow DOB to be exported to excel. In Export to Excel Button click event we have to write rules in such a way that before calling execute export to excel method we have to hide the particular column then execute export to excel method and then show back the column that we set hidden.

Now the rules should like below.

This would hide the DOB column in excel report.

This approach is useful when we are using any HTML literal columns inside listview as export to excel will show the complete html in excel report. To avoid showing html we can use this approach.

  • When you have DateTime columns in your listview then this export to excel method has a flaw in it. It displays wrong date & time. To fix this issue we have to change the format of that DateTime column.

Please check this community post which is regarding the same.

https://community.k2.com/k2-five-112/wrong-date-in-exported-excel-files-113834

Simple Email OTP Verification in K2 Smartforms and SQL

In any signup or registration forms OTP Verification for Mobile Number or Email Id is very common requirement these days. Let’s see how can implement a Simple E-Mail Id Verification in K2 Smartforms using OTP.

Verification process starts when user enters his EmailId and Click Verify Button after which the user will receive an OTP on his emaild. Once the user receive’s OTP he needs to enter that OTP in the form and click Submit to complete the Verification Process. OTP will be expired in 5 min after which he needs to request for a new OTP.

Here we are using SQL server Table & Stored procedure to generate and validate an OTP. Below are the table and stored procedure details.

  • Create a table in SQL Server with name EmailVerificationCodes. Below is the Table Create Script

CREATE TABLE [dbo].[EmailVerificationCodes](

            [CodeId] [uniqueidentifier] NOT NULL,

            [Code] [nvarchar](6) NOT NULL,

            [EmailId] [nvarchar](50) NOT NULL,

            [TimeStamp] [datetime] NOT NULL,

 CONSTRAINT [PK_EmailVerificationCodes] PRIMARY KEY CLUSTERED (

            [CodeId] ASC

)WITH (PAD_INDEX = OFF, STATISTICS_NORECOMPUTE = OFF, IGNORE_DUP_KEY = OFF, ALLOW_ROW_LOCKS = ON, ALLOW_PAGE_LOCKS = ON) ON [PRIMARY]

) ON [PRIMARY]

GO

ALTER TABLE [dbo].[EmailVerificationCodes] ADD  CONSTRAINT [DF_EmailVerificationCodes_CodeId]  DEFAULT (newid()) FOR [CodeId]

GO

Stored Procedure :

/*****************************************************************

Procedure     : HandleEmailVerificationCodes

Created Date  : 25 May 2020

Testing       :

EXEC [HandleEmailVerificationCodes] NULL,NULL,’r.vijaykanth@yahoo.com’,’Insert’

EXEC [HandleEmailVerificationCodes] ‘91530260-303A-4511-A895-C45E4CBF48E5′,’9160996′,’r.vijaykanth@yahoo.com’,’validate’

*****************************************************************/

CREATE PROCEDURE [dbo].[HandleEmailVerificationCodes]

         @CodeId            UNIQUEIDENTIFIER     =      NULL

        ,@Code                    NVARCHAR(6)                =      NULL

        ,@EmailID           NVARCHAR(50)         =      NULL

        ,@Mode                    NVARCHAR(10) 

AS

BEGIN

       DECLARE @Return      NVARCHAR(50) = NULL

       IF(@Mode = ‘Insert’)

       BEGIN

              DECLARE @tempTable TABLE([GeneratedGUID] [uniqueidentifier]);

              SET @Code = 1000000-CEILING(RAND()*100000)

              INSERT INTO EmailVerificationCodes(Code,EmailId,TimeStamp)

              OUTPUT INSERTED.[CodeId] INTO @tempTable

              VALUES(@Code,@EmailID,GETDATE())

              SELECT @Return = GeneratedGUID FROM @tempTable

       END

       ELSE IF(@Mode = ‘Validate’)

       BEGIN

              DECLARE @DBCode NVARCHAR(6), @DBTimeStamp DATETIME = NULL, @MinutesDifference INT = NULL

              SELECT @DBCode = Code, @DBTimeStamp= [TimeStamp] from EmailVerificationCodes WHERE CodeId = @CodeId

              SELECT @MinutesDifference = DATEDIFF(mi, @DBTimeStamp, GETDATE())   

              IF (@Code <> @DBCode)

              BEGIN

                     SET    @Return = ‘!! Invalid OTP

              END

              ELSE IF(@Code = @DBCode AND @MinutesDifference > 5)

              BEGIN

                     SET    @Return = ‘!! Expired OTP

              END

              ELSE

              BEGIN

                     SET @Return = ‘Success’

              END

       END

       SELECT @Return AS ‘Result’, @Code ‘Code’

END

  • Above Stored procedure is both for generating and validating OTP
  • Create a smart object for the above stored procedure and we are ready to start the smartforms.
  • Create a new view and design it as shown below.
  • 2 Textboxes one to enter EmailId and one for OTP.
  • 3 Buttons Verify: to initiate Verification process, Submit to validate the OTP & Resend OTP for requesting new OTP.
  • 4 Data Labels one to show OTP Timer (5 Minute timer) and [MessageText] to show OTP Validation Error Messages. CodeId, DL : To store the OTP id generated and the OTP to be sent in Email.
  • One Tick Mark Picture to show that Email has been Successfully Verified.

Rules

  • Timer Rules and Controls will be same as shown in my previous post.
  • Button Verify Click Rule as shown below.
  • Send an Email as below
  • After Send Email, Show a message to User saying that OTP sent.
  • Rule: Handle Show Email Controls will just show the OTP Controls along with Submit and Resend Buttons.
  • Button Submit Click rule

That’s it. We have completed the rules part. Just save and run the view. below is the sample test run

Implement a Countdown Timer in K2 Smartforms

Countdown timers are very useful when you have Email/OTP Validations on your Web forms with a time limit. Currently K2 doesn’t have an OOB control to do this, but we can achieve this by using a Timer control. Let’s see how we can implement.

In the sample which I’m using below, there is an Email Verification in which User enters his Email Id and clicks Submit to receive a 6-Digit Code on his email Id, this 6 – Digit code will be valid for 5 minutes and user should see Time Left countdown timer before he can request for another code. To achieve this I have used 2 timer controls and a data label on the web form and used some expressions which I’m explaining step by step below.

Steps

  1. Drag 3 Data Labels and Name them as Minutes, Seconds & TimerMessage. Set Minutes Value to 5 and Seconds value to 00 (Note: Set Seconds Value Data Label format to Custom Type “00”). Also Set visible to “False”
  2. Drag 2 Timer Controls, Name them as 1SecondTimer, 5MinuteTimer with Interval value to 1000 & 305000 milliseconds respectively
  3. Drag 2 Buttons one to start Timer & other to stop timer.
  4. Now we need 3 expressions 

Expression 1: Set Name as ExpressionSecondsCounter and the expression should be set as shown below (This is for Seconds Counter)

Expression 2: Set Name as ExpressionMinutesCounter and the expression should be set as shown below (This is for Minutes counter)

Expression 3:  Set Name as ExpressionTimerText and set the expression as shown below. (this expression is for the user display datalabel)

Now go to rules tab and select when a control on the view raises an event and select 1SecondTimer Ticked. In that rule just add a transfer data rule and click configure and drag and drop ExpressionMinutesCounter & ExpressionSecondsCounter to their respective datalabels Minutes & Seconds.

This rule executes per each second as we have set interval to 1000 milliseconds.

Now similarly add one more rule to configure 5MinuteTimerTicked Event and inside that write a rule to set Message as Expired and then add 2 rules to stop the timers. See below screen shot.

This rule executes for every 5 minutes as we have kept 305000 milliseconds. After 5 minutes we are setting User Display Text to Code Expired.

Complete the Button click rules to Start and Stop the timers respectively.

That’s it, now save the View and run it to see the output.

In My Next post I will show you how to do a simple Email Verifications in smartforms using SQL database.

Thanks for Reading!

Sharepoint List Binding with K2 Workflow & Smartforms

Today we shall see how we can bind a K2 workflow with a Sharepoint List and trigger the workflow when an item gets added to the list. Also we shall see how we can use K2 smartforms for adding & updating an items in SharePoint list.

In previous post I have shown how to enable K2 for a list using K2 Five for Sharepoint tool and the options for generating the Smartobjects, Smartforms, workflows & Reports for the list. Now we look at the other way to achieve the same.  I’ll be using the Same Users SharePoint list which I have shown in previous post

Click on K2 tab and select application which will open the page as shown below

As we have selected only Smartobjects generation in previous post, it is just showing them. Now Click on New tab and Select Generate Forms which will show you below screen.

Now click OK and the tool will generate view and forms for you based on the list columns and once it completes it will show you below screen with all the views and forms that are automatically created.

It will create 3 forms one for adding a new item, one for editing and one for display purpose. We can directly edit the form or view from here if you want to change anything like look and feel or controls. Also you can edit these forms from the K2 Designer which I have shown in my previous post.

Click on Settings to see or change the forms to show.

Now navigate to Users List and click on new to see the K2 Form which is highlighted in below screen.

Now let’s create a new workflow and associate with this list, so that whenever a new user is added to this list it will create an approval task to some user and updates the status accordingly.

Now from the Users List K2 Application screen, click on New and select workflow.

Now it will show you below screen where you find 2 options to trigger the workflow. One is via Smart form submit button and the second way is via Sharepoint list item events that are available and shown there.

Here I’ll select “When the following events occur” and select “An item was added” and select OK which will open K2 workflow Designer. Now design your workflow with your requirements.

In Users List I have added a new column called Status and initially when a new User is added to the list, the status will be Pending Approval and once the task is assigned to Manager and he performs as an action then accordingly the status will be updated and workflow will complete.

Below is the screen shot of workflow that is created for this purpose. I’ll create a separate post explaining the process of creating a workflow in new designer with all the events that we have now.

Now Create a New User in List and see the Workflow is getting Triggered status will be set as Pending Approval

And task is getting assigned in TaskList (You can access Tasklist from K2 Tab in Users List.)

Approve the task and see the status getting changed.

That’s it. This is how we can make use of K2 Smartforms and Workflows along with Sharepoint list.

Thanks for reading!!

Bagi2info.com

Tips dan Trik Komputer, Tutorial Pemrograman, SQL, PHP, React Native - Expo

Mohamed Ashiq Faleel

Its time to think about Microsoft 365

Common Man Tips for Power Platform, Dynamics CRM,Azure

Venkata Subbarao Polisetty - Microsoft MVP,C# Corner MVP

James K2 Blog

Tips and Tricks about K2 workflow software

the BPM freak !!

"The illiterate of the 21st century will not be those who cannot read and write, but those who cannot learn, unlearn, and relearn" – Alvin Toffle

Start Rule

Learning K2 blackpearl and K2 Five

K2Ranger

Do K2 like a BOSS!!

Maverick

discover your own way and lead the world... with Divya Raj

jeylabs

Work Intelligently

Chasing Time - Mobile Gaming Photography Tips Tricks

#iamtheiosphotographer Pro Mobile Game Reviews, Tips, Tri

Jozsef Torsan

Founder & Software Engineer - Creator of the Bookmark Ninja Online Bookmark Manager

GreenEggs on K2

Saving the world with K2